Wasp Barcode Technologies: The Barcode Solution People
How to Load Ribbons in a Barcode Printer
You learned in our first post of this series how to load labels into your barcode printer. Now, if you are using thermal transfer labels, you will need to load a ribbon, too.
If you are using direct thermal labels, do not load a ribbon! You will just thoroughly confuse your barcode printer and waste good supplies.
First Steps: Compatibility
Regardless if you are using a desktop or industrial printer, you first need to make sure you have ribbon that is compatible with your printer’s manufacturer. Unlike barcode labels, ribbons in general are not compatible across printer manufacturers. The manufacturers use different wind directions for their ribbons, different roll lengths, and different number of notches in the core, if they use them at all.
The exception to this rule is that there are supplies manufacturers, like
Black Tie, that will make lower priced versions of the printer manufacturers’ ribbons. Sometimes, even the printer manufacturers get in this game and make their own versions of their competition’s ribbons. You still need to make sure that the ribbon you buy is made for your printer.
First Steps: Which Side has the Ink?
Before you load the ribbon into your printer, you need to figure out which side of the ribbon carries the ink. You’ll probably need to do this only the first time you load a ribbon because you’ll remember or at least can imitate how the old ribbon is loaded…provided, of course, that the old ribbon was loaded correctly!
Like I said before, the printer manufacturers wind their ribbons in different directions. Some are wound in and some are wound out. Both sides of the ribbon look black (or whatever color ribbon you may be using). Both sides can look shiny (depending on the ribbon formulation).
Here’s the best way we’ve found to figure out which side has the ink. Take a piece of scotch tape and stick it to one side of the ribbon. Pull it up gently. If black stuff comes up with it, that’s the side with the ink. The ink side needs to come in contact with the label, so make sure that side it facing down when it passes under the print head.
Desktop Barcode Printers
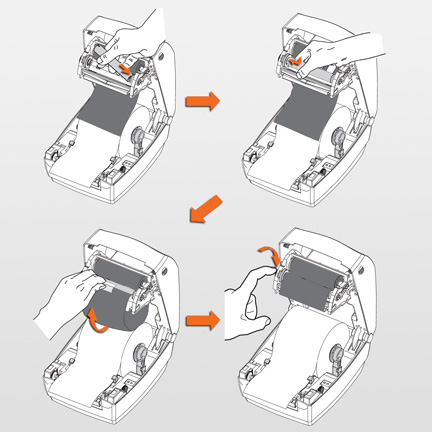
Most desktop barcode printer ribbon comes with a take-up spool for the used ribbon. Sometimes though, the take-up spool comes in the printer’s box. When the first roll of ribbon is used up, you use its empty spool as the take-up spool for the next ribbon.
- Open the top of the printer.
- Unwind part of the ribbon to wrap around the take-up spool.
- Place the ribbon roll on the ribbon supply spindles. These are placed further back in the printer then the take-up spindles. Some models require you to flip open the print head to get to the spindles.
- If your ribbon core has notches, rotate the roll until those notches lock into place.
- Place the take-up spool on the take-up spindle, which should be near the front of the printer.
- Again, if the spool has notches, rotate it until those notches lock into place.
- Center the loose end of the ribbon on the take-up spool and attach it with tape (some ribbons will come with an adhesive strip on the ribbon).
- Rotate the wheel attached to the take-up spindle until all the slack in the ribbon is gone and it is pulled tight across the print head.
- Close the top of the printer.

Desktop barcode printer ribbons use a take-up spool for the used ribbon. If your ribbon core has notches, make sure those are locked in the ribbon supply spindles before you thread the ribbon on the take-up spool.
Industrial Barcode Printers
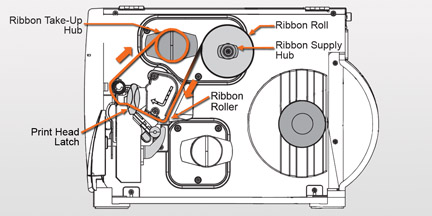
Industrial barcode printers have take-up hubs that don’t require a spool.
- Raise the media door.
- Unwind part of the ribbon to wrap around the take-up hub.
- Place the ribbon roll on the ribbon supply hub. These are placed further back in the printer then the take-up hub.
- Open the print head. There is usually a lever or latch that you raise to do this.
- Slide the ribbon under the ribbon roller, under the print head, and then up to the ribbon take-up hub.
- Some printers have a ribbon dancer assembly, which are two small rollers under the ribbon supply hub.
- Thread the ribbon under the upper roller, over the lower roller, and then under the ribbon roller.
- Wrap the ribbon around the ribbon take-up hub.
- Close the print head.
- Rotate the wheel attached to the take-up spindle until all the slack in the ribbon is gone and it is pulled tight across the print head.
- Close the media door.

Industrial barcode printer ribbon goes from the ribbon supply hub under the ribbon roller, under the print head, and then up to the ribbon take-up hub.


